Step 2: First Boot
This assumes you installed a FRESH Raspberry Pi OS Lite (64-bit) image on your SD card, and have powered up the Pi using Step One of this tutorial. If you attempt this with an existing Pi OS installation, these instructions may not work fully.First Boot
The very first time you boot a fresh Pi OS, it will take a few minutes, and restart itself once or twice. You can either connect a monitor to watch its progress, or just go take five. Either way, it will finish its configuration silently without any intervention required.You may see the LEDs flash a few times.
Finding your Pi - The Easy Way
Hopefully by the time you've read the above paragraph, the Pi is fully booted and online. Again that can take (only for the very first boot) a good few minutes.Update (Dec. 12, 2024): So I've been showing people the HARD way. On most simple networks, you can simply type
hostname.local to go
directly to that device -- no IP address needed.
The easiest way to check, is to go to the Windows Search bar, and type
cmd
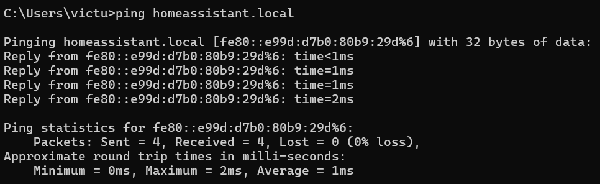
and press enter. Then, type ping hostname.local, using the hostname
you chose during the Pi installation.
You should see something like this:
If instead you see something like this:

Then it did not work, and you'll want to follow along the rest of this page.
Note: Make sure you gave the Pi long enough to finish that initial boot sequence before giving up!If that works for your network, you can also simply type
hostname.local
into PuTTy (in the next step) to log into the Pi that way.
That Worked - Skip to the Next Step!
Otherwise, read along the rest of this page...
Finding your Pi - The Other Method
We need to find the Pi's IP address. I recommend logging into your WiFi Router. The router's address may be printed on the side or bottom of the router itself.If not, look at your network settings on your PC, and find the Gateway IP Address. One way to find that is:
- Click in the Windows Search Box
- Type
cmdand press enter - Type
ipconfigand press enter
192.168.0.1 or
10.0.0.1.
Then type into your browser's address bar (NOT the search box):
http://192.168.0.1/Substituting the address above with your Gateway IP address. Log into your router. If you don't know the username and password, it may be written on a sticker on the router itself; alternatively, if you've never changed it, you might be able to Google search for "(your router brand and model) default login and password"...
Once logged into your router, find an entry of raspberrypi (unless you changed the hostname in the previous step) under Wireless Clients or Connected Devices. Consult your WiFi Router instructions (or Google) to find this if it's not immediately obvious...
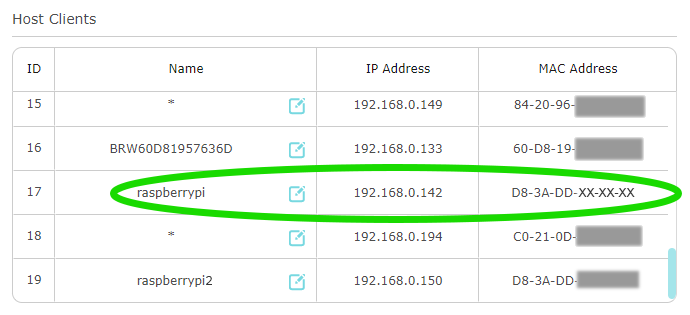
Note that I have two Pis on my network, each with a different hostname. If your router does NOT show the hostname (raspberrypi), and shows Unknown or just an asterisk, then look for the first three bytes of the MAC address to be one of the following:
Copy and Paste both the MAC address and the IP address into a Notepad for reference later.D8-3A-DD-xx-xx-xx<-- Most Likely for the Pi 4
28-CD-C1-xx-xx-xx

B8-27-EB-xx-xx-xx

DC-A6-32-xx-xx-xx

E4-5F-01-xx-xx-xx
Next, in the WiFi router, find a setting to assign a "Fixed", "Reserved", or "Static" IP address for a device. This will likely be under an Advanced menu, under Network and DHCP Server. Example in my tp-link router:
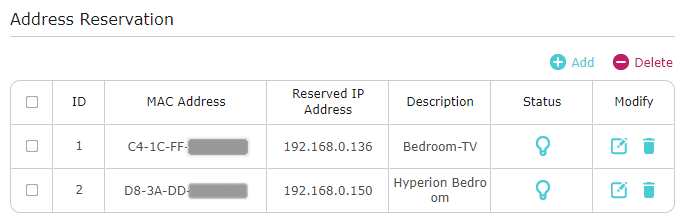
Note that I also reserved the IP of my VIZIO TV, for reasons that will become clear in a later step. You should do the same for your Television and write that down as well...
▶ Hint: If you can't easily find your Television in the Router configuration, you can usually find the IP Address using the TV remote, under Network Settings. Then find that IP in the list and, using its MAC address, reserve an IP for it as well
Reserving the IP address ensures that it won't change, so you can access it from a browser or SSH without having to look it up again. Later, this will also allow the Pi to "talk" to your Television... So write this information down!
Click Here if your router does NOT allow you to use a fixed IP in the DHCP range (usually 100-200).
In any case, Write Down the IP Address now assigned to your Raspberry Pi and Television! These will be needed in future steps...
▶ Note: You will likely need to restart both the Pi and the Television for this change to take effect.▶ Next: Log Into the Pi
For the TV, you should UNPLUG IT, wait a few seconds, and plug it back in, to ensure that the WiFi/Network restarts.
◀ Prev: Install the OS

