TUTORIAL NOTES:
This tutorial is intented as a companion to my ▶ YouTube Video, and its instructions apply ONLY to that specific hardware configuration! If you have not followed the video, please click above and do so -- otherwise these instructions may not work for your particular hardware setup!
No Warranties are Implied -- if you fry your Raspberry Pi, your Television or anything else, we are not responsible!
If you landed here without going through the other steps, please start here
Dismiss This Message
SSH Into the Pi
Next we need to log into the Pi from another computer. This will be the easiest way to configure everything as we go along.Windows Users
For Windows users, I recommend downloading PuTTY. Click the link, then click "Download PuTTY". On the next page you'll find an MSI Installer, choose the appropriate one (most likely the first option, 64-bit x86 - choose the .msi installer).▶ NOTE: Even if you already have PuTTy installed, I highly recommend installing the latest version!Follow the installation instructions. If you didn't create a Desktop icon, simply type 'putty' into the Windows Search bar and press 'Enter'.
When you launch PuTTY, you'll be greeted with this:
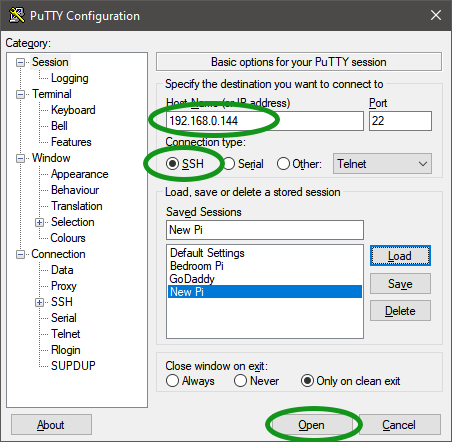
Type
hostname.local (or the IP address) of the Pi into the Host Name (or IP address) box,
make sure SSH is selected, and click Open. If prompted, accept the
"Server Key".
▶ Note: If this is not your first attempt (eg, a reinstall of Raspberry Pi OS) you will get some warnings. Simply ACCEPT these, as the new install will have the same physical address but a brand-new KEY.Then, log in using the username and password you chose during Step 1, when we created the image on the SD card. Optionally, maximize this window for easier reading when pasting long lines, OR you can side-by-side the PuTTy window with this browser (How?).
Copy & Paste using PuTTY
To Paste into PuTTY, with your cursor where you want the text to go, simply right-click anywhere on the PuTTY window.Other Desktop Users
For Mac users, find an SSH client in the App store. For Linux users, simply open a terminal and type:ssh 192.168.0.xxxLogging In for the First Time
Once you have connected, you should see this:login as: login as: your_username
your_username@192.168.0.150's password: (type your password here)
Linux raspberrypi 6.1.21-v8+ #1642 SMP PREEMPT Mon Apr 3 17:24:16 BST 2023 aarch64
The programs included with the Debian GNU/Linux system are free software;
the exact distribution terms for each program are described in the
individual files in /usr/share/doc/*/copyright.
Debian GNU/Linux comes with ABSOLUTELY NO WARRANTY, to the extent
permitted by applicable law.
Last login: Fri Oct 13 07:44:42 2023 from 192.168.0.127
your_username@raspberrypi:~$
Note that the green text is just for presentation here; the
actual color depends on your terminal and doesn't matter, it's simply green here
to clarify (for these instructions) that we're on the Pi console.
If you have gotten this far successfully, and are logged into your Raspberry Pi OS via
SSH, we can move on to the next step.
▶ Next: Configure the Software
◀ Prev: First Boot & Find the IP Address
↩ Back to the Beginning

