Hardware - Some Notes
This page is, and likely always will be, a work in progress. As I learn new things, or things change or prices change or... I will be doing my best to keep this page (this entire website) as up-to-date as possible.Some of the information in my various videos on the topic may be out-of-date. None of it is wrong, but as you may see if you follow my videos, each one does at least one thing better or easier compared to the videos that came before it.
I do have a YouTube Playlist with all of my HyperHDR / Hyperion / Ambilight related videos; it could be fun to watch them in order, to see how I learned as I went along, and try to pass that information along to you!
With that out of the way, let's get started!
Hardware Setup
The hardware needed to replicate what you've seen me do on YouTube in various videos can be found on this page.Any time I publish a new video, this website will be updated with the latest information possible, and may even be more up-to-date than any of the videos.
Connecting the Pi
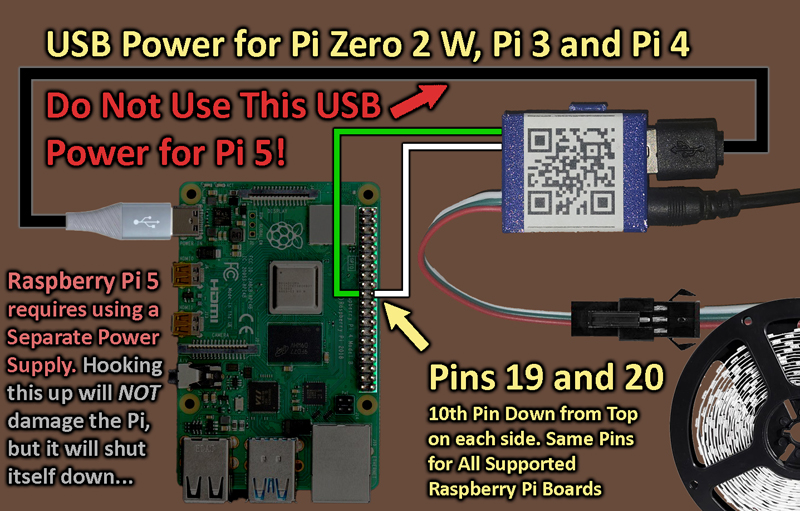
(Updated December, 2025)For the Raspberry Pi 5, the GPIO 18 method I show in many of my videos does NOT work. Instead you have to use the SPI MOSI method, so instead of wiring the green wire to the "sixth pin down" as instructed, use the image below instead.
This newer SPI method DOES work on other Pi models, but unless you have the Pi 5 specifically, I still recommend using GPIO 18 as in the videos.
Both methods are covered in the tutorial. As long as you follow the Raspberry Pi software installation guide as it is, you can use either method.
Remember: for the Pi 5 you HAVE to use the SPI method!
Additionally, you cannot use the USB cable from my Level Shifter to POWER the Pi 5; you will need to use a separate, recommended power supply.
For the SPI method, you will need to connect the Green wire from the level shifter to Pin 19 (10th pin down on the LEFT side of the header), and the white wire to Pin 20 (10th pin down on the RIGHT side of the header):
Click for Larger Version
LED Strip
Whether you have a WS2812b or an SK6812, or any 3-wire, 5-Volt RGB or RGBW LED light strip, for my project we will connect them in the following manner:First, using my Level Shifter / Power Adaptor Cable, we supply power and data from this adaptor to the LED strip simply by plugging in the JST-SM connector from the adaptor to the LED strip input side.
Once you've installed the LEDs to the back of your screen, as demonstrated in this video, I've added another step to get more consistant light levels through the entire strip: Power Injection.
Power Injection is simply adding another 5-Volt source further down the strip, helping overcome the resistance of having to travel the entire length of the strip.If you purchased the Bundle with the Corner connectors and Power-Injection crimp-on connector, this is really simple.
One method that works well when arranging the strip into a full loop, as we're doing here, is to simply connect the same power supply onto the end of the strip.
Making sure to observe the + and - markings on the cut end of the strip, simply attach one end of the crimp connector to that end of the strip, and crimp the Red and White wires (coming from the INPUT side) into the other end of the connector. Red goes to the Plus side, and white to the Minus side.
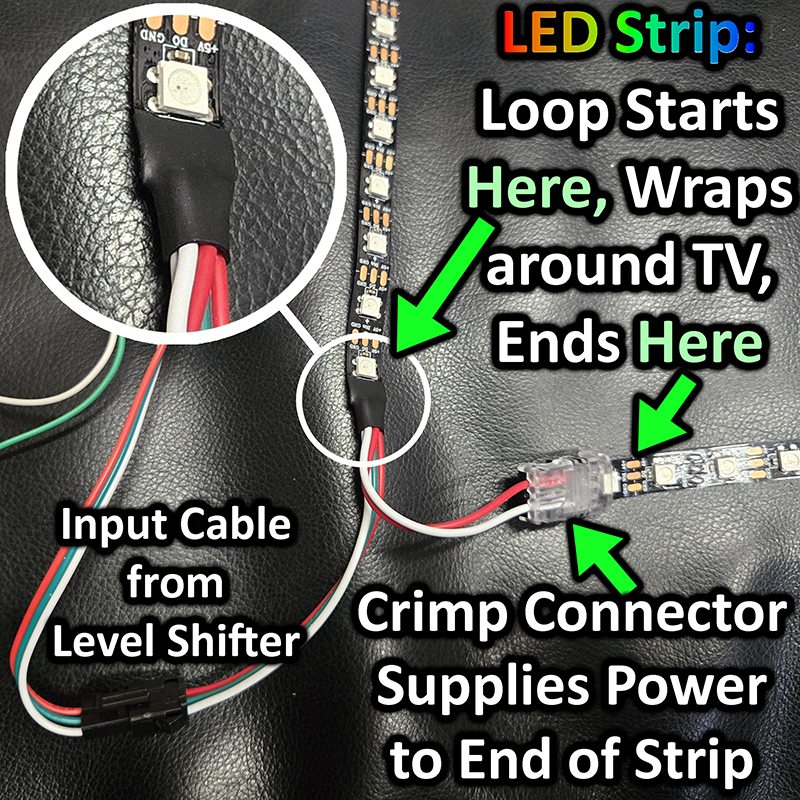
This will feed power to both ends of the LED strip.
Note: The crimp connector I mention is a new addition (as of February, 2025) to my Hyperion Bundle. If you do not have that bundle, you can purchase these crimp connectors in packs of 10 from Amazon.
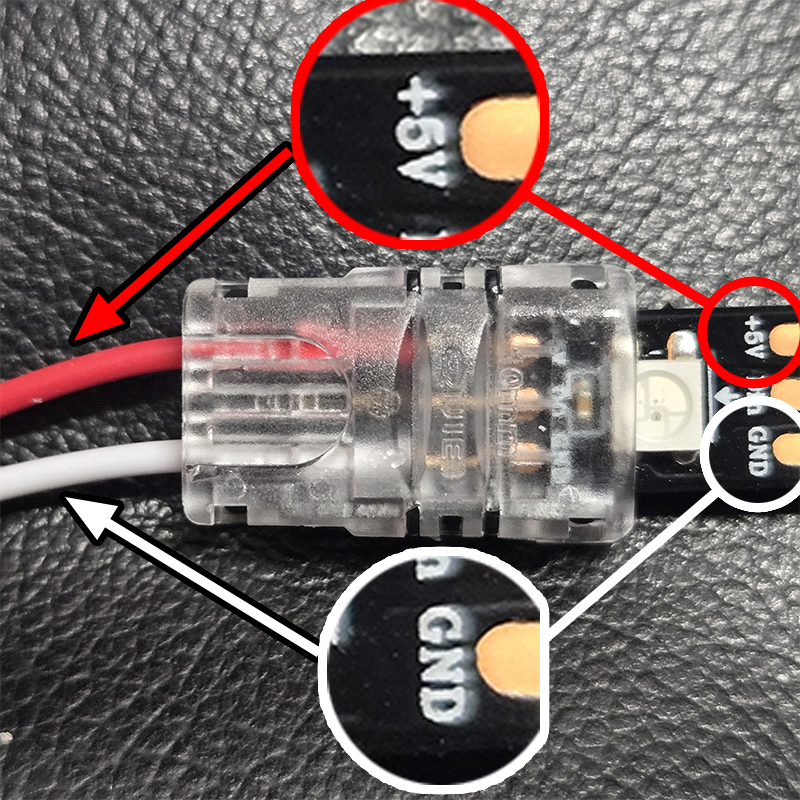
Note: Do NOT connect anything to the DATA (middle) pad on this end of the strip!
The LED Strip goes into the shorter end (right-side of the picture) and the wires into the longer end.
You may need pliers to fully crimp the connector, carefully applying pressure until you hear the plastic tabs click into place.
Other Hardware
The rest is covered in the various videos, specifically this one, but there are a few changes since that video was made.First, I now recommend using a separate Splitter and HDMI Capture Device. The "pass-thru" version I showed in that video unfortunately does not work well and I no longer recommend it.
See the Hardware Links page for my current recommendation for the Splitter and Capture devices.
The rest is pretty straight-forward. Connect your HDMI source device -- a streaming box, game console, PC, or whatever you have -- into the splitter. If you chose the splitter (or 4-input switcher) that I recommend, you have the option to "downscale" one of the outputs.
I recommend doing this -- downscale Output 2 down to 1080p, and feed that directly to the Capture device.
This will NOT affect the signal going to Output 1 (your TV), but it takes some of the pressure off of the Raspberry Pi, as it is now working with much less video data.
Remember, we're only lighting up a couple hundred LEDs - we do NOT need to process 8,294,400 pixels of color (a 4k image) to do so!
Other Considerations
Use high-quality HDMI cables wherever possible. A cheap, damaged or worn cable can cause endless problems.Keep any hardware mounted directly on your TV away from any vents -- do NOT block the ventilation of the TV!
You may need to use additional adhesive; the adhesive backing on the LED strips is not always the best... and may come loose after some time, even if you thoroughly cleaned the surface.
With that, please email me with any suggestions to add to this page, or comment in any of my videos. I read ALL comments, and I try to reply to most.
Thanks for reading. If you like, head on over to the configuration section to set up and configure HyperHDR.

